Sunday, January 19, 2025

Easy-to-follow garden shed plans for beginners

Build Your Dream Garden Shed: A Beginner's Guide

Tired of garden clutter taking over your yard? Dreaming of a neat and organized space for your tools and supplies? Building your own garden shed is easier than you think! This guide provides simple, step-by-step plans perfect for beginners, empowering you to create a functional and aesthetically pleasing addition to your outdoor space. We'll walk you through the process from planning to the final touches, ensuring a rewarding DIY experience.

Planning Your Perfect Shed

Before you grab a hammer, careful planning sets the stage for a successful build. First, determine the shed's size. Consider your storage needs; a larger shed accommodates more items but requires more materials and effort. Next, choose a location with good access and level ground. Check local building codes and regulations before beginning construction to ensure compliance. Finally, gather your tools and materials. A detailed materials list, available in the appendix, will prevent costly mid-project trips to the hardware store.

Choosing the Right Materials

Opt for pressure-treated lumber for its durability and resistance to rot and insects. Consider using readily available standard sizes for easier cutting and assembly. For roofing, asphalt shingles offer a cost-effective and durable solution. Don't forget about fasteners â€" you'll need plenty of screws, nails, and possibly bolts depending on your design.

Constructing the Shed's Foundation

A sturdy foundation is crucial for stability. We'll focus on a simple concrete slab foundation. Begin by marking the shed's perimeter on the ground. Next, excavate the area to the desired depth (typically 4-6 inches). Compact the soil thoroughly. Then, create a formwork using wooden planks to contain the concrete. Finally, pour and level the concrete, allowing it to cure completely before proceeding. For those seeking a faster alternative, consider using concrete blocks as a base.

Alternative Foundation Options

If you prefer a quicker and simpler approach, you can opt for a gravel base. This involves laying down a layer of landscaping fabric followed by a compacted gravel bed. This method is suitable for lighter sheds in well-drained soil. However, a concrete or block foundation provides superior stability and longevity.

Building the Shed's Frame and Walls

Assemble the frame using pressure-treated lumber. Begin by constructing the floor frame directly on the foundation. Then, erect the side walls, ensuring they're plumb and square. Use appropriate bracing to maintain structural integrity. Securely attach the wall framing to the floor frame. Once the walls are in place, install the roof trusses. Pre-fabricated trusses simplify this step, especially for beginners.

Adding the Roof and Sheathing

After constructing the roof frame, attach the roof sheathing (plywood or OSB). This provides a solid base for the roofing material. Finally, install your chosen roofing material, ensuring proper overlapping and sealing to prevent leaks. Remember to use appropriate safety equipment when working at height.

Finishing Touches and Doors

Install the shed doors, using hinges and a sturdy latch. Consider adding windows for ventilation and natural light. Then, add any desired siding, such as plywood or composite panels. Finally, apply a protective sealant or paint to further extend the shed's lifespan and enhance its appearance. You might also consider adding shelves and other internal storage solutions.

Personalization and Finishing

This is where your creativity shines! Personalize your shed with a fresh coat of paint, add decorative trim, or install a weather vane. Consider adding a small window box or hanging plants to add some character. Enjoy your newly built, customized garden shed!

Building your own garden shed is a rewarding experience. By following these simple steps and using readily available materials, you can create a functional and beautiful addition to your outdoor space. Remember to prioritize safety and take your time â€" enjoy the process!

Thursday, November 21, 2024

How to Build a DIY Pallet Shed: Step-by-Step Plans for Beginners

How to Build a DIY Pallet Shed: Step-by-Step Plans for Beginners

How to Build a DIY Pallet Shed: Step-by-Step Plans for Beginners

Dreaming of extra storage space without the hefty price tag of a professionally built shed? You're in luck! This guide provides a comprehensive, step-by-step approach to constructing your own charming and functional pallet shed. Using reclaimed pallets offers an eco-friendly and budget-friendly solution, allowing you to unleash your inner builder and personalize your outdoor space. Let's get started!

Planning Your Pallet Shed Project

Before you grab your hammer, careful planning ensures a successful build. First, determine the size and location of your shed. Consider the space available in your yard, access for delivery of materials (if needed), and local building regulations. Sketch a simple design outlining the dimensions, door placement, and any additional features you envision, like windows or a roof overhang. Next, source your pallets. Inspect them thoroughly for rot, damage, and loose nails before committing to using them. You'll need enough to cover the walls, roof, and floor. Finally, gather your essential tools and materials, which we will cover in detail later. A well-laid plan will prevent costly mistakes and save you valuable time.

Gathering Materials and Tools

Essential Materials:

Your materials list will vary depending on the size of your shed, but here’s a general guideline:

  • Reclaimed pallets (sufficient for walls, roof, and floor)
  • Strong, treated lumber for the frame (4x4 posts for the base and 2x4s for the walls and roof)
  • Roofing material (metal, shingles, or recycled plastic sheets)
  • Exterior-grade screws and nails
  • Concrete or gravel for the base (depending on your chosen foundation)
  • Exterior-grade paint or sealant (optional, for weather protection)
  • Door hardware (hinges, handle, latch)
  • Window frames and glass (optional)

Essential Tools:

Having the right tools at hand will make the process smoother and more efficient:

  • Measuring tape and level
  • Hammer and claw hammer
  • Drill with various drill bits (including a screw-driving bit)
  • Circular saw or hand saw
  • Shovel (for digging the base)
  • Safety glasses and work gloves
  • Post hole digger (optional, for setting posts in concrete)

Building the Foundation and Frame

Begin by preparing a level base. For a simple solution, consider a gravel base, ensuring it is compacted and leveled. For a more permanent structure, you may opt for a concrete foundation, pouring concrete into a prepared formwork. Once the base is set, construct the frame using your treated lumber. Begin by setting the corner posts, ensuring they are plumb and level. Then, attach the horizontal beams to create a sturdy rectangular frame for the walls. Carefully measure and cut the lumber to ensure accurate dimensions. Remember, a solid frame is crucial for a stable and long-lasting shed.

Assembling the Walls and Roof

Now comes the rewarding part â€" constructing the walls! Attach the pallets to the frame using screws and/or nails. Ensure that the pallets are securely fastened, and stagger the joints for added strength. You may need to cut some pallets to fit the dimensions of your walls. For the roof, create a simple gable or shed roof design using more treated lumber. Once the roof frame is complete, secure your chosen roofing material, ensuring it is weatherproof and durable. Remember to check for any gaps and seal them appropriately.

Adding the Door and Finishing Touches

After completing the walls and roof, install your door. Use strong hinges and secure the door handle and latch. If you're including windows, install them now, ensuring a proper seal to prevent drafts and leaks. Finally, consider applying exterior-grade paint or sealant to protect your shed from the elements and enhance its aesthetic appeal. This step will significantly prolong the life of your structure and give it a more polished look. Take your time and enjoy the satisfaction of completing your DIY project!

Safety First!

Always prioritize safety throughout the entire building process. Wear safety glasses and work gloves at all times. Be cautious when using power tools and ensure that the work area is clear of obstacles. If you're unsure about any aspect of the project, don't hesitate to seek professional advice.

Step-by-Step Simple Pallet Shed Plans for Budget-Friendly Construction

Step-by-Step Simple Pallet Shed Plans for Budget-Friendly Construction

Constructing a Budget-Friendly Pallet Shed: A Comprehensive Guide

This guide provides a detailed, step-by-step approach to constructing a simple yet functional shed using reclaimed pallets. This method prioritizes affordability and sustainability while offering a practical storage solution. Careful planning and execution are crucial for ensuring structural integrity and longevity.

I. Planning and Preparation

A. Assessing Your Needs and Site Selection

Before embarking on construction, a thorough assessment of your requirements is paramount. Consider the intended use of the shedâ€"will it primarily store garden tools, outdoor equipment, or other items? This will determine the necessary size and internal configuration. Accurate dimensions are essential for efficient material sourcing and construction.

Site selection is equally critical. Choose a level, well-drained location that offers adequate sunlight and proximity to power sources (if required for future electrical installations). Ensure the chosen location complies with local building regulations and doesn't obstruct pathways or views.

B. Sourcing and Inspecting Pallets

The foundation of this project lies in sourcing suitable pallets. Recycled pallets are readily available from various sources, including construction sites, businesses, and recycling centers. However, careful inspection is vital to ensure structural soundness. Look for pallets made of robust wood, free from significant rot, insect infestation, or excessive damage. Prioritize pallets of consistent size and material for easier construction.

Note: Some pallets may be treated with chemicals; prioritize heat-treated pallets (HT) marked with the IPPC stamp, which are safe for reuse. Avoid pallets treated with methyl bromide (MB) as they pose health risks.

C. Material List and Tool Preparation

Compile a comprehensive list of materials, including the number of pallets required based on your shed's dimensions. You may also need additional lumber for reinforcement, roofing materials (e.g., corrugated metal sheets, plywood), fasteners (nails, screws), and any desired finishing materials (e.g., paint, sealant).

Gather necessary tools beforehand to streamline the construction process. This list may include a hammer, saw (circular saw or hand saw), measuring tape, level, drill, screwdriver, safety glasses, work gloves, and potentially a crowbar for pallet disassembly.

II. Shed Construction

A. Foundation Construction

While a concrete foundation is ideal for longevity, a simpler approach using compacted gravel or paving stones can suffice for a budget-friendly shed. Level the ground thoroughly and create a base of compacted gravel at least 4 inches deep. Alternatively, use a layer of paving stones to form a stable base. This ensures adequate drainage and prevents ground moisture from damaging the wooden structure.

B. Pallet Preparation and Assembly

Disassemble the pallets carefully, removing any loose or damaged components. Inspect each plank for soundness. Clean the pallets thoroughly to remove debris, dirt, and any potential hazards. You might need to use a wire brush and possibly a pressure washer, depending on the condition of your pallets.

Begin assembling the shed's walls using the reclaimed pallet planks. You can arrange them vertically or horizontally, depending on your preference and the condition of the wood. Ensure the planks are tightly joined and secured using nails or screws, adding additional support where needed. Consider using pressure-treated lumber for the base frame to increase durability.

C. Framing and Wall Construction

Create a sturdy frame for the shed using additional lumber if the pallets themselves aren't strong enough to form the entire structure. This frame will provide structural integrity and allow for secure attachment of the pallet walls. Ensure the frame is square and level using a measuring tape and level. Attach the prepared pallet sections to the frame using appropriate fasteners.

For added strength, consider adding vertical supports between the pallet sections, creating a robust and stable wall structure. This is especially important for taller sheds.

D. Roof Construction

The roof design depends on your preference and the overall shed design. A simple gable roof is relatively straightforward to construct. Construct the roof frame using lumber, ensuring adequate slope for water runoff. Cover the roof frame with your chosen roofing material (corrugated metal sheets or plywood). Secure the roofing material tightly to prevent leaks.

E. Door and Window Installation (Optional)

If desired, incorporate a door and/or window into the shed design. Use additional lumber to create a door frame and secure a suitable door. For windows, cut openings in the pallet walls and install appropriate window frames and glass or plexiglass.

III. Finishing Touches and Maintenance

A. Sealing and Finishing

To protect the wood from the elements and extend the shed's lifespan, apply a weather-resistant sealant. This will prevent rot and insect infestation. Consider painting the shed for aesthetic appeal and further protection from the elements. Choose a high-quality exterior paint designed to withstand weathering.

B. Ongoing Maintenance

Regular maintenance is crucial for ensuring the longevity of your pallet shed. Periodically inspect the structure for any signs of damage, loose fasteners, or wood rot. Tighten any loose fasteners and repair any damaged sections promptly. Re-apply sealant as needed to maintain protection against the elements.

This comprehensive guide provides a detailed framework for building a budget-friendly pallet shed. Remember to prioritize safety throughout the construction process and always adhere to local building regulations. With careful planning and execution, you can create a functional and aesthetically pleasing storage solution using readily available and sustainable materials.

Build a Reliable Shed with These Basic and Easy-to-Follow Plans

Build a Reliable Shed with These Basic and Easy-to-Follow Plans

Constructing a Reliable and Durable Shed: A Comprehensive Guide

This comprehensive guide provides detailed instructions for building a reliable and durable shed, suitable for a range of applications, from storing gardening tools to housing workshop equipment. The plans presented are designed for ease of construction, emphasizing practicality and straightforward techniques. While prior experience with carpentry is beneficial, this guide is structured to be accessible to DIY enthusiasts with moderate skill levels. Safety precautions are paramount throughout the process; always prioritize personal safety and adhere to all relevant building codes and regulations.

Phase 1: Planning and Preparation

Before commencing construction, meticulous planning is crucial for a successful outcome. This involves determining the shed’s dimensions, location, and material selection. Careful consideration of these factors will minimize potential problems and ensure a structurally sound and aesthetically pleasing final product.

1.1 Determining Shed Dimensions and Location

The size of your shed will primarily depend on its intended use. Consider the volume of items you need to store and allow for sufficient space for maneuvering within the shed. Common shed sizes range from 6ft x 4ft to 10ft x 8ft. Larger sheds necessitate more complex construction techniques and may require permits in certain jurisdictions. Choose a location that is level, well-drained, and easily accessible. Consider proximity to power sources if electrical components are anticipated. Avoid locations that could obstruct views or impede access to other structures on your property. Check local zoning regulations for any restrictions on shed placement.

1.2 Material Selection

The choice of materials significantly impacts the shed's durability, cost, and aesthetic appeal. Pressure-treated lumber is highly recommended for its resistance to rot and decay, particularly for the foundation and framing. For the siding, options include pressure-treated wood, vinyl, or metal panels. Each option offers different advantages in terms of maintenance, longevity, and cost. Pressure-treated wood provides a natural aesthetic, while vinyl and metal offer low-maintenance solutions. Consider the overall design and select materials that complement your existing structures and landscaping.

1.3 Necessary Tools and Materials

Assemble a comprehensive list of tools and materials prior to commencing construction to avoid delays. A thorough inventory ensures you have everything required and minimizes the need for interruptions during the build process. This list should include, but is not limited to:

  • Measuring tape
  • Level
  • Shovel
  • Post-hole digger (if required)
  • Circular saw
  • Drill with various drill bits
  • Screwdriver (both Phillips and flathead)
  • Hammer
  • Safety glasses
  • Work gloves
  • Pressure-treated lumber (for framing and base)
  • Siding material (wood, vinyl, or metal)
  • Roofing material (e.g., asphalt shingles)
  • Concrete mix (for foundation, if applicable)
  • Nails or screws
  • Weather stripping

Phase 2: Foundation Construction

A stable foundation is paramount for a long-lasting shed. The chosen foundation type depends on the shed’s size and the soil conditions. For smaller sheds, a simple concrete slab or gravel base suffices. Larger sheds may require a more robust foundation, such as concrete piers or a full concrete foundation. Ensure the foundation is level and appropriately sized to support the shed’s weight.

2.1 Preparing the Ground

Begin by clearing the chosen location of any vegetation, debris, or loose soil. Mark the perimeter of the shed's foundation using stakes and string. Ensure the area is level, using a level to check for any discrepancies and adjusting as needed. For a concrete slab foundation, excavate a level area to a depth of approximately 4 inches. For a gravel base, dig a slightly deeper area to accommodate the gravel layer.

2.2 Constructing the Foundation

For a concrete slab foundation, pour a layer of gravel for drainage and compact it firmly. Then, install a vapor barrier over the gravel. Construct a formwork from lumber to contain the concrete pour. Mix the concrete according to the manufacturer's instructions and pour it into the formwork, ensuring an even and level surface. Allow the concrete to cure completely, typically for 24-72 hours, before proceeding.

For a gravel base foundation, lay down a layer of compacted gravel, ensuring a level and stable surface. The thickness of the gravel layer should be sufficient to provide a firm and level base for the shed's floor framing. For a more substantial foundation consider using concrete piers set in the ground at the corners and midway along the sides. These provide excellent support and are suitable for less stable ground conditions.

Phase 3: Framing and Wall Construction

The framing provides the shed’s structural integrity. Precise measurements and careful assembly are essential to ensure a square and stable structure. Use pressure-treated lumber for the framing, ensuring all joints are properly secured with nails or screws.

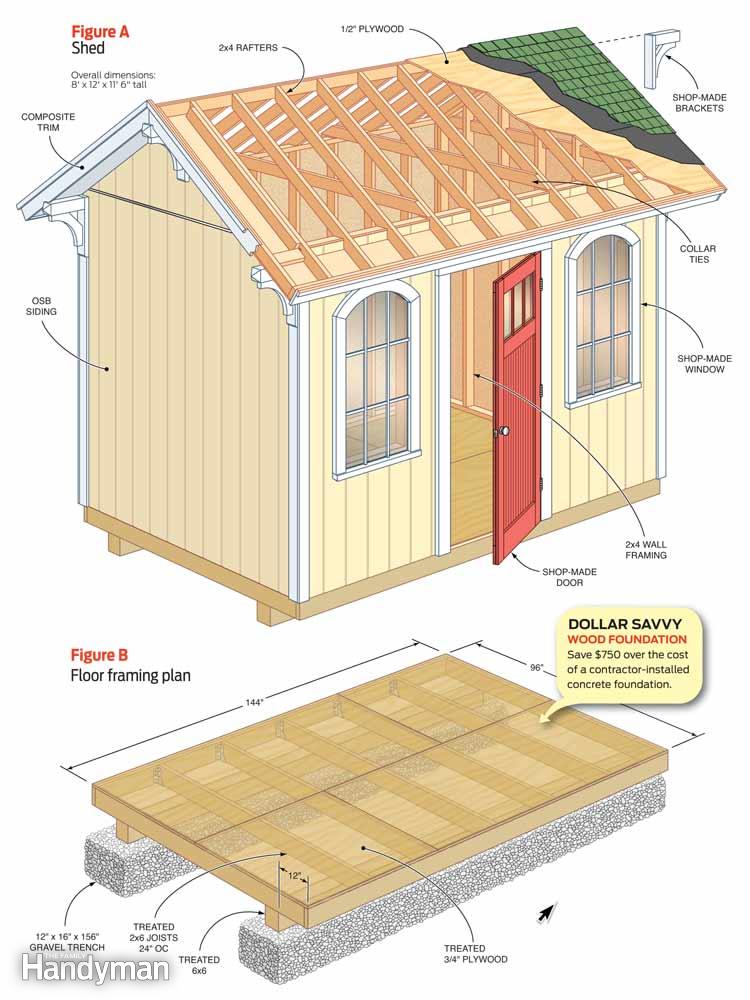
3.1 Building the Floor Frame

Construct the floor frame by building a rectangular frame using pressure-treated lumber. Cut the lumber to the required lengths and secure the joints with screws or nails. Add cross-members for extra support, ensuring even spacing across the floor frame. This frame will form the base for your shed's floor. Attach the floor frame to the foundation using appropriate fasteners.

3.2 Erecting the Wall Frames

Build the wall frames using pressure-treated lumber, creating rectangular frames for each wall. Ensure the frames are square and plumb, using a level and a square to check measurements. Construct the frames on the ground, then carefully lift them into position and secure them to the floor frame. Add additional bracing to enhance stability.

3.3 Installing the Siding

Once the wall frames are erected, attach the chosen siding material. Follow the manufacturer's instructions for installation. Ensure proper alignment and overlapping of the siding panels for optimal weather protection. Use appropriate fasteners to secure the siding to the wall frames. For wood siding, ensure proper sealing and painting or staining to protect against the elements.

Phase 4: Roof Construction and Finishing

The roof protects the shed's interior from the elements. Proper construction is vital for durability and longevity. Consider the roof pitch and the chosen roofing material when planning this stage. A steeper pitch aids water runoff.

4.1 Building the Roof Frame

Construct the roof frame according to your chosen roof style (gable, shed, hip, etc.). Use pressure-treated lumber and ensure all joints are properly secured. The roof frame should be firmly attached to the wall frames. Use appropriate bracing to ensure the roof's stability and prevent sagging.

4.2 Installing the Roofing Material

Install the chosen roofing material, following the manufacturer's instructions. Ensure proper overlapping of the roofing material to prevent leaks. Use appropriate nails or screws to secure the roofing to the roof frame. Consider adding underlayment for additional protection against moisture.

4.3 Final Touches and Finishing

Once the roof is complete, add any finishing touches, such as weather stripping around doors and windows, trim around the edges of the shed, and any desired paint or stain.

Phase 5: Safety Precautions and Considerations

Throughout the entire construction process, safety should be your top priority. Always wear appropriate safety equipment, including safety glasses and work gloves. Use caution when operating power tools, and ensure proper ventilation in the work area. Follow all manufacturer's instructions for materials and tools. Regularly check your work for structural integrity and correct any issues promptly. Consult with building professionals if you are unsure about any aspect of the construction process, especially regarding local building codes and regulations. Adhering to safety protocols not only ensures your personal safety, but also contributes to the longevity and reliability of the finished structure.

By carefully following these plans and prioritizing safety, you can successfully build a reliable and durable shed that will serve its purpose for many years to come. Remember to adjust these plans to suit your specific needs and local conditions. Consult relevant building codes and regulations before starting your project.

Step-by-Step DIY Pallet Shed Plans for a Durable Backyard Shed

Step-by-Step DIY Pallet Shed Plans for a Durable Backyard Shed

Build Your Dream Backyard Shed: A Comprehensive DIY Pallet Shed Guide

Tired of overflowing garages and cluttered yards? Dreaming of a stylish and functional backyard shed without breaking the bank? This step-by-step guide will teach you how to build a durable and attractive shed using reclaimed pallets, turning your weekend project into a source of pride.

Planning Your Pallet Shed Project

Before you dive into construction, careful planning is crucial. Begin by determining the desired dimensions of your shed. Consider the storage needs you aim to fulfillâ€"bikes, gardening tools, outdoor furniture? Sketch a basic design, noting the location of doors, windows (if desired), and shelves. Remember to check local building codes for any restrictions on shed size or placement. You'll need to source your pallets; inspect them carefully for rot, damage, and any loose nails or staples. Clean them thoroughly before starting construction.

Gathering Your Materials

Beyond the pallets, you'll need additional materials. This includes:

  • Strong wood screws: Choose exterior-grade screws for durability.
  • Wood glue: For extra strength in joining pallet components.
  • Level: Essential for ensuring a square and stable structure.
  • Measuring tape and pencil: For accurate measurements and marking.
  • Circular saw or hand saw: To cut pallets to size (if necessary).
  • Safety glasses and work gloves: Protect yourself from splinters and flying debris.
  • Hammer and nail puller: For removing loose nails and staples from pallets.
  • Roofing material: Choose a material suitable for your climate (e.g., asphalt shingles, metal roofing).
  • Optional: Exterior paint or sealant to protect the wood and enhance aesthetics.

Constructing the Shed Frame

Start by building the floor frame. This forms the foundation for the entire structure. Use sturdy pallets as the base, arranging them to create a flat and level surface. Secure them together using wood screws and glue. Next, build the walls. Carefully dismantle some pallets to obtain usable wood planks. Construct vertical frames using these planks, ensuring they are plumb and square using your level. Attach these frames to the floor frame using screws and glue. For added strength, consider reinforcing the corners with additional bracing.

Assembling the Roof

For a simple gable roof, build two triangular roof sections. Use the reclaimed pallet wood or purchase additional lumber if needed. Ensure the roof rafters are properly spaced and securely attached to the top of the wall frames. Once the roof structure is complete, attach your chosen roofing material, following the manufacturer's instructions.

Adding Finishing Touches and Refinements

Once the main structure is complete, add the door. You can either create a door from reclaimed pallet wood or use a pre-made door. Securely attach hinges and a latch. Consider adding windows for ventilation and light. These can be purchased pre-made or creatively constructed from reclaimed materials. For enhanced durability and appearance, apply a layer of exterior-grade paint or sealant. This protects the wood from moisture and the elements, extending the life of your shed.

Personalizing Your Pallet Shed

Let your creativity shine! Add shelves for increased storage, paint it a vibrant color to complement your garden, or even add decorative elements such as climbing plants or a weather vane. Your pallet shed is a testament to your DIY skills; make it truly reflect your style!

Building a pallet shed is a rewarding experience that combines creativity, resourcefulness, and hard work. Following these steps and exercising patience, you'll soon have a sturdy and attractive backyard shed that enhances your outdoor space and provides valuable storage. Enjoy your new shed!

DIY 10x12 Pallet Shed Plans: A Low-Cost Solution for Garden Storage

DIY 10x12 Pallet Shed Plans: A Low-Cost Solution for Garden Storage

DIY 10x12 Pallet Shed Plans: A Low-Cost Solution for Garden Storage

Constructing a garden shed can be a significant undertaking, both financially and in terms of time commitment. However, with careful planning and the utilization of readily available and cost-effective materials, such as reclaimed pallets, a functional and aesthetically pleasing structure can be achieved at a fraction of the cost of professionally built sheds. This detailed guide provides comprehensive plans for building a 10x12 foot pallet shed, focusing on minimizing expenses while maximizing durability and practicality.

I. Planning and Preparation: Laying the Foundation for Success

Before commencing construction, meticulous planning is paramount. This phase involves several crucial steps that significantly impact the final outcome and overall success of the project.

A. Site Selection and Preparation

Choosing the appropriate location for your shed is vital. Consider factors such as sunlight exposure, proximity to water sources (for potential drainage issues), and accessibility for material delivery and future maintenance. Ensure the chosen site is level and free from any significant obstructions. Clear the area of vegetation, debris, and rocks. Level the ground using a shovel and a spirit level, creating a firm and stable base for the shed’s foundation.

B. Material Acquisition and Assessment

The foundation of this project relies on reclaimed pallets. Source pallets responsibly, ensuring they are treated lumber (HT or heat treated) and free from rot, significant damage, or pest infestations. Inspect each pallet meticulously before incorporating it into the structure. You will require a considerable number of pallets (approximately 40-50 depending on the desired wall height and pallet condition), alongside supplementary materials including:

  • Concrete blocks or a suitable alternative for the foundation.
  • Pressure-treated lumber for the framing (optional, but recommended for increased durability).
  • Roofing materials (e.g., corrugated metal, asphalt shingles).
  • Fasteners (screws and nails appropriate for the chosen pallet and lumber types).
  • Weatherproofing sealant.
  • Door and window hardware.
  • Optional: Paint or stain for added aesthetic appeal and protection.

C. Tool Selection and Safety Precautions

Ensure you have the necessary tools before commencing construction. This will streamline the process and enhance efficiency. Essential tools include:

  • Measuring tape and level.
  • Hammer or nail gun.
  • Screwdriver (or drill/driver).
  • Saw (circular saw or hand saw).
  • Safety glasses and gloves.
  • Shovel.
  • Optional: Power tools for faster construction (e.g., impact driver).

Safety is paramount. Always wear appropriate safety gear, including safety glasses and gloves, and operate power tools according to manufacturer instructions. Take precautions to prevent injuries and ensure a safe working environment.

II. Construction: Building the 10x12 Pallet Shed

The construction process is divided into manageable stages, facilitating a systematic and organized approach.

A. Foundation Construction

Construct a robust foundation using concrete blocks arranged in two rows to create a level base approximately 4 inches high. This provides sufficient clearance from the ground and prevents moisture damage. Alternatively, consider a poured concrete slab or a compacted gravel base for enhanced stability, particularly in areas prone to flooding or unstable soil conditions.

B. Wall Construction

Begin by assembling the pallet walls. This requires careful planning to ensure even spacing and structural integrity. Disassemble any damaged pallets and use the usable boards for infill if needed. You can create a framework using pressure-treated lumber for added strength before attaching the pallets to the frame, creating a more robust and stable wall. This frame will greatly enhance the overall structural integrity and prevent racking. Secure pallets using screws to avoid splitting the wood. Ensure vertical alignment using a level and plumb bob to guarantee evenness.

C. Roof Construction

The roof design should be considered carefully based on the local climate and desired aesthetic. A simple gable roof offers good drainage and is relatively easy to construct. Frame the roof using pressure-treated lumber, ensuring sufficient pitch for water runoff. Cover the framed roof structure with your chosen roofing material, ensuring proper overlap and sealing to prevent leaks. Consider adding a waterproof membrane under the roofing material for added protection.

D. Door and Window Installation

Incorporate a suitable door and windows into your design. You can either use reclaimed doors and windows or purchase new ones. Ensure the door and window frames are securely attached to the wall structure for optimal weatherproofing and security. Use appropriate sealant to prevent drafts and water ingress.

E. Finishing Touches

Once the main structure is complete, focus on the finishing touches. This includes applying a weatherproofing sealant to all joints and exposed wood surfaces to protect against moisture damage. Consider painting or staining the shed to enhance its aesthetic appeal and provide additional protection against the elements. Add any desired internal shelving or storage solutions.

III. Cost Considerations and Material Optimization

The primary advantage of this project lies in its cost-effectiveness. By utilizing reclaimed pallets, the material costs are significantly reduced compared to using new lumber. However, accurate budgeting is still crucial. Consider the following cost factors:

  • Pallet Acquisition: The cost will vary depending on your location and the source of the pallets. Consider negotiating prices, particularly when sourcing larger quantities.
  • Supplementary Materials: The cost of pressure-treated lumber, roofing materials, fasteners, and other hardware needs careful consideration.
  • Tools: If you lack specific tools, factor in rental costs or the purchase price of new tools.
  • Labor: While a DIY approach minimizes labor costs, allocate time realistically for the project. Unexpected delays can impact the overall budget.

IV. Maintaining Your Pallet Shed

Regular maintenance is essential for prolonging the lifespan of your pallet shed. This includes:

  • Annual Inspection: Check for any signs of damage, rot, or pest infestation.
  • Weatherproofing: Re-apply sealant to joints and exposed wood surfaces as needed.
  • Cleaning: Regularly remove debris and maintain cleanliness to prevent pest infestations.
  • Roof Maintenance: Inspect the roof for any signs of damage or leaks and repair as necessary.

Building a 10x12 pallet shed is a rewarding project that combines practicality, cost-effectiveness, and environmental consciousness. By following these plans meticulously and prioritizing safety, you can create a valuable addition to your garden, providing ample storage space for years to come.

How to Build a Pallet Shed DIY: Affordable and Functional Backyard Storage

How to Build a Pallet Shed DIY: Affordable and Functional Backyard Storage

How to Build a Pallet Shed DIY: Affordable and Functional Backyard Storage

Hey there, fellow DIY enthusiasts! So, you're looking to build a shed, but the prices at the home improvement store are making your wallet weep? I get it. Building a shed can seem daunting, but I'm here to tell you it doesn't have to break the bank. In fact, you can build a pretty awesome, functional backyard storage shed using reclaimed pallets â€" and it’s way more satisfying than buying a pre-made one!

Why Choose Pallets?

Let's be honest, pallets are awesome. They’re readily available (often free!), super sturdy, and already pre-assembled (mostly!). This means less work for you and more time enjoying your newly built shed. While you'll need to do some prep work, the cost savings are incredible. You can often find pallets behind businesses or on Craigslist â€" just remember to ask permission before taking any.

Important Note: Not all pallets are created equal. Avoid pallets that have been treated with chemicals (like methyl bromide), as these can be harmful. Look for heat-treated pallets â€" they'll usually have an "HT" stamp. If you’re unsure, it's always best to err on the side of caution and pass on that pallet.

Planning Your Pallet Shed: Size and Design

Before you start grabbing pallets, you need a plan. How big do you want your shed to be? What will you store in it? Consider these factors:

Size and Dimensions

Start by sketching out a rough design on paper. Consider the space you have available in your backyard. A smaller shed (e.g., 4ft x 6ft) might be perfect for storing gardening tools and outdoor cushions, while a larger one (e.g., 8ft x 10ft) can accommodate more equipment and even a small workbench.

Door Placement and Size

Think about where you'll place the door and how wide you need it to be. You'll want easy access to your stored items. Remember you'll need to factor in the size of the pallets when determining door size. One or two pallet widths might be ideal.

Roof Style

A simple gable roof (triangular) is relatively easy to construct and sheds water effectively. A shed roof (sloped in one direction) is another simple option. Remember to consider local building codes and wind conditions when choosing a roof design.

Gathering Your Materials and Tools

Beyond the pallets, you'll need a few other things:

  • Foundation: Concrete blocks, gravel, or even a wooden base are good options. The choice depends on your budget and the ground conditions.
  • Fasteners: Plenty of screws (exterior-grade!), nails, and possibly bolts, depending on your design.
  • Wood: You might need additional lumber for framing, supports, or roofing if you can't solely rely on pallets.
  • Roofing Material: Tarps, corrugated metal sheeting, or even recycled shingles are possibilities. Consider the weather in your area.
  • Tools: Hammer, drill, saw (circular or hand saw), level, measuring tape, safety glasses, work gloves.
  • Optional: Pressure-treated wood for ground contact, paint or stain to weatherproof the pallets, and hinges/latch for the door.

Building Your Pallet Shed: Step-by-Step

This is a general guide, and the exact steps will depend on your specific design. Always prioritize safety and wear appropriate safety gear.

Step 1: Prepare the Pallets

Clean the pallets thoroughly â€" remove any loose nails, debris, or protruding splinters. Sand down any rough edges to prevent injuries. Inspect them for any significant damage.

Step 2: Build the Foundation

Level the ground where you plan to build your shed. Construct your chosen foundation â€" concrete blocks are a solid and relatively easy option. Make sure it’s level to ensure a stable shed.

Step 3: Assemble the Walls

Start constructing the walls using the prepared pallets. You can either stack them directly on the foundation or create a frame to attach them to. Use screws to secure the pallets together. For added stability, consider adding vertical supports between the pallets.

Step 4: Build the Roof Frame

Construct the roof frame according to your chosen design. Again, you may need additional lumber for this part. Make sure the frame is sturdy and level.

Step 5: Add Roofing Material

Attach your chosen roofing material to the frame. Ensure it’s properly sealed to protect your shed from the elements. Tarps are a budget-friendly option, but corrugated metal is more durable.

Step 6: Attach the Door

Hang your door using hinges. Add a latch or lock for security. Remember that pallets themselves might require some additional framing to create a functional door.

Step 7: Finishing Touches

Apply paint or stain to weatherproof your shed and give it a nice aesthetic finish. Add any extra features, such as shelves or a window (if you’ve planned for one).

Tips for Success

  • Take your time: Rushing the project can lead to mistakes.
  • Measure twice, cut once: This is crucial, especially when working with wood.
  • Ask for help: Don’t be afraid to enlist a friend or family member for assistance.
  • Check local building codes: Ensure your shed meets any regulations.

Commonly Asked Questions

Q: How long does it take to build a pallet shed?

A: This depends on the size and complexity of your design. Expect to spend several hours to a few days, depending on your experience and pace.

Q: How much does it cost to build a pallet shed?

A: The cost depends heavily on your materials. If you find free pallets, your costs will be minimal, perhaps just for fasteners and roofing materials.

Q: Are pallet sheds durable?

A: With proper construction and weatherproofing, a pallet shed can be surprisingly durable and long-lasting. However, they won’t stand up to harsh weather conditions as well as a shed constructed from treated lumber.

Q: Can I use treated pallets?

A: It's generally recommended to avoid using chemically treated pallets due to potential health hazards. Look for heat-treated pallets instead.

Q: Do I need a permit to build a shed?

A: This varies by location. Check with your local council or building department to determine if you need a permit.

Building a pallet shed is a rewarding project that allows you to get creative, save money, and create a functional storage space in your backyard. Remember to plan carefully, work safely, and enjoy the process! Happy building!

Search This Blog

Powered by Blogger.

Easy-to-follow garden shed plans for beginners

Build Your Dream Garden Shed: A Beginner's Guide Tired of garden clutter taking over your yard? Dreaming of a neat and organized sp...